How to Rename a Contact in PracticeMaster

How to Rename a Contact in PracticeMaster

To Rename a Contact in PracticeMaster follow the steps below:

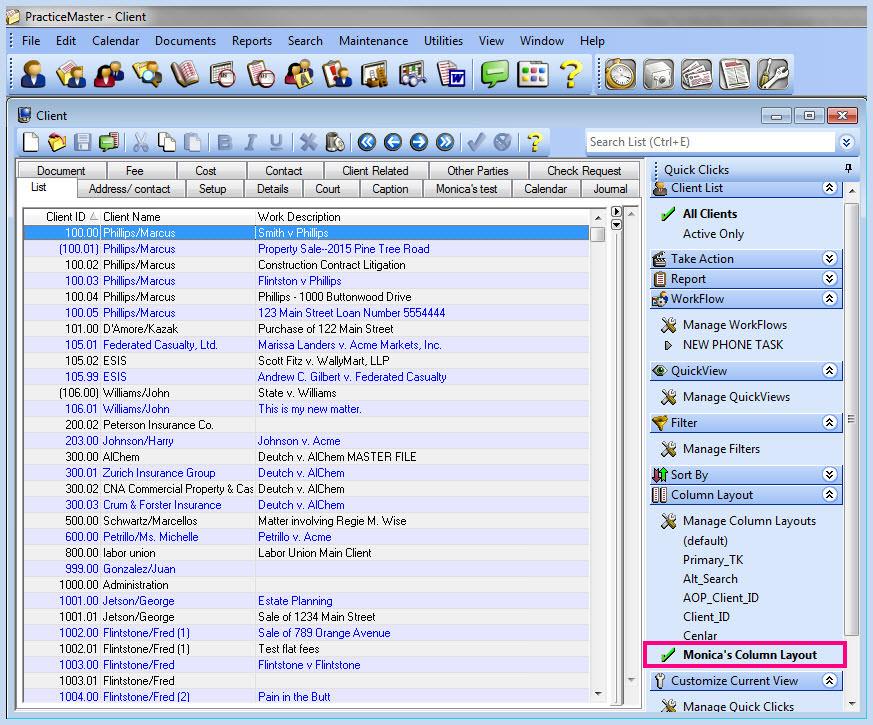
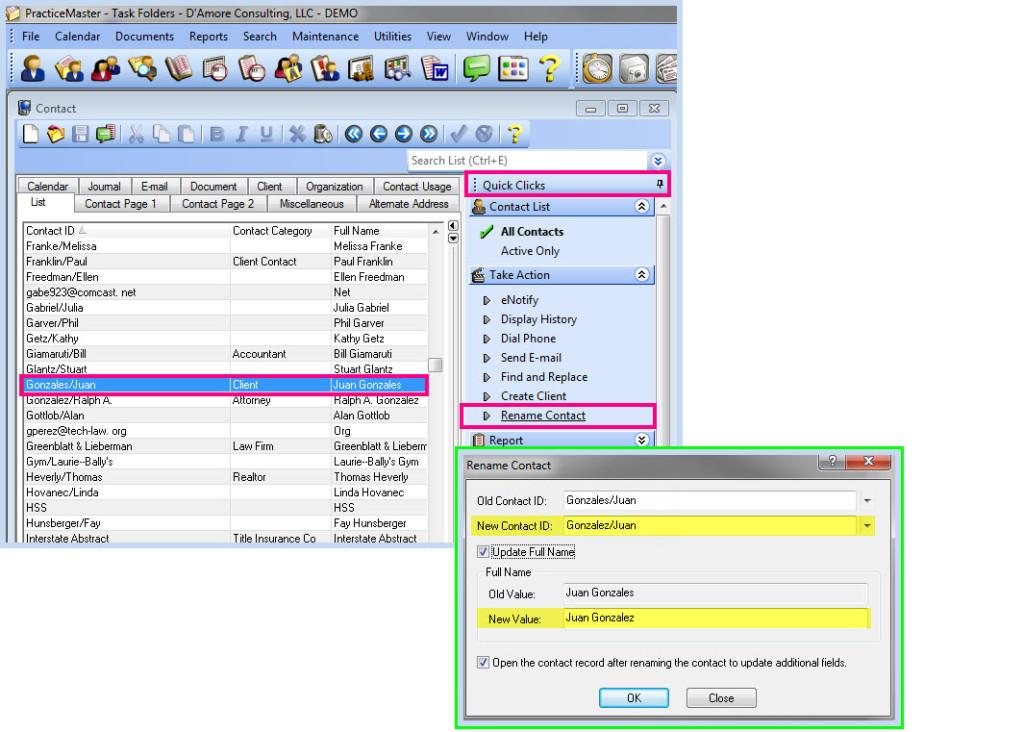
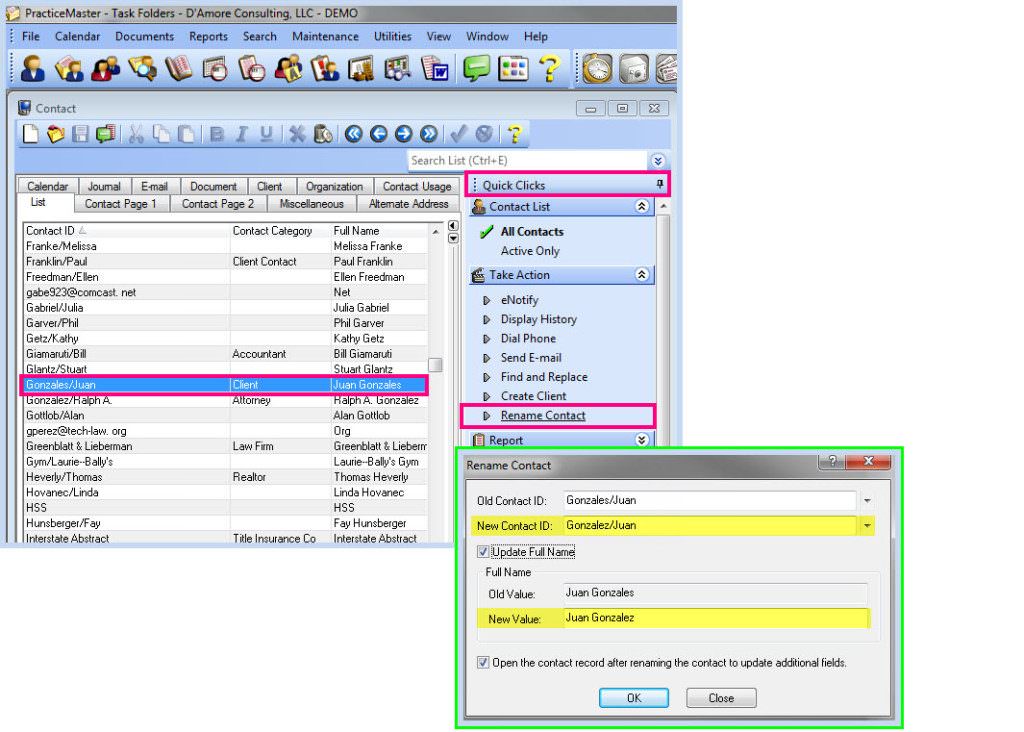
Open the “Contacts” program
Locate and Select the contact to change
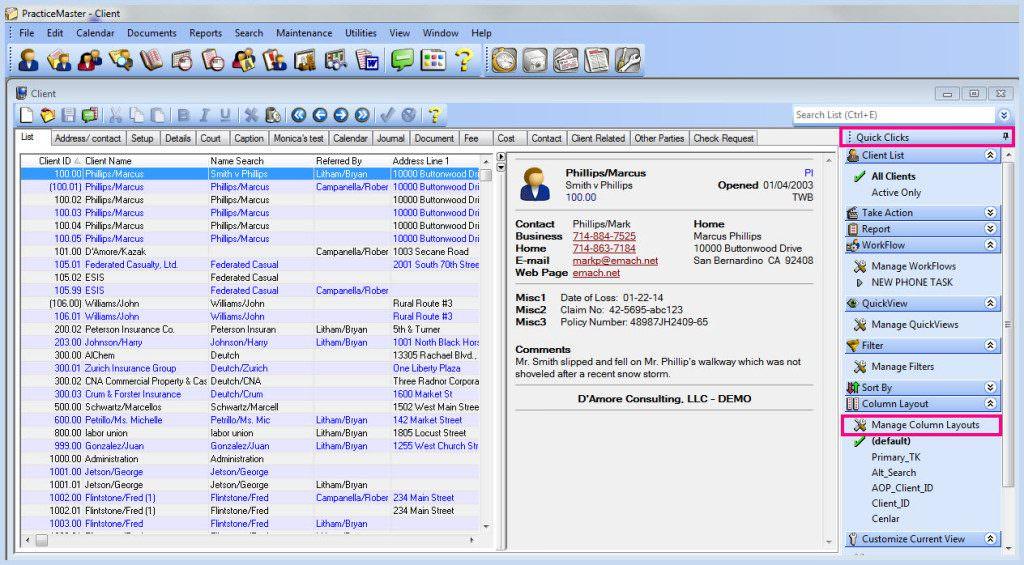
Open the Quick Clicks Menu
Click on Rename Contact
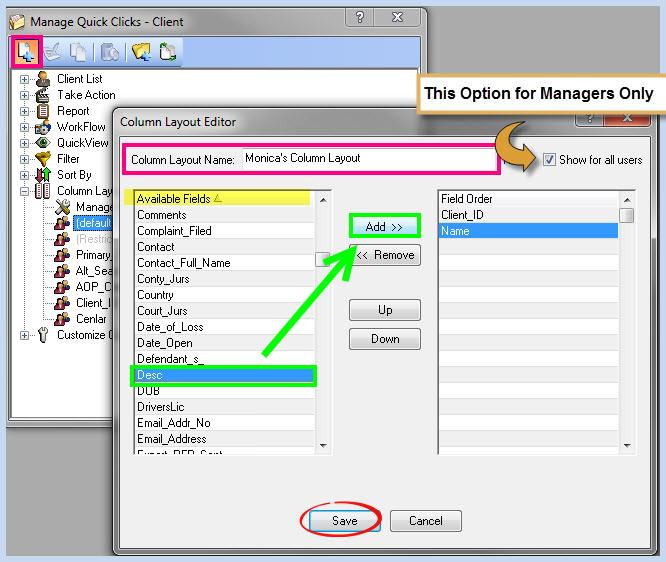
Enter the New Contact ID*
Opt to update the Full Name (or not)
Click on OK

*RENAMING FOR CASE This utility does not recognize case. So if you want to rename a contact because of case (i.e. SMith/Mary) you will first have to rename the Contact ID to something like: Smith/Mary1 and then you can rename again to Smith/Mary.
You now have the ability to define a closing date that prevents any journal entries from being posted prior to the closing date (A), and define a number of days before and after the current working date for journal entries (B).

Find Us

Telephone

856-310-0006

Email Address

monica@damoreconsulting.com

Mailing Address

218 Hutchinson Avenue Haddonfield, NJ 08033

Contact Us

  • This field is for validation purposes and should be left unchanged.

How to Apply a Payment to Multiple Matters in Tabs3

How to Apply a Payment to Multiple Matters in Tabs3

To Apply a Payment to Multiple Matters in Tabs3, follow the steps below:

Open the Tabs3 Payment Entry Program and enter: the Client ID (any matter for the client will do), Date, Tcode, Amount, and Check Number

Click on the “Apply Payments to Multiple Files” button

Answer “Yes” When Prompted: Are you Sure you want to apply the payment to multiple matters?

If the payment is equal to the amount due for all matters, then individual payment records are automatically created for each matter.

If the payment is not equal to the amount due for all matters, then the “Payment Amounts for Multiple Matters” window will be displayed (shown below) allowing you to apply the payment as desired to each of the matters with an amount due.

Find Us

Telephone

856-310-0006

Email Address

monica@damoreconsulting.com

Mailing Address

218 Hutchinson Avenue Haddonfield, NJ 08033

Contact Us

  • This field is for validation purposes and should be left unchanged.

How to Merge Duplicate Vendors in Tabs3 Accounts Payable

How to Merge Duplicate Vendors in Tabs3 Accounts Payable

To Merge Duplicate Vendors in Accounts Payable, Follow the Steps Below:

IMPORTANT!

Please read the “Notes” section at the end of this post before beginning!

From the Accounts Payable Task Folders, Click on: Maintenance | Invoice | Transfer Invoices
Answer “Yes” to back up if prompted (Platinum users will not be prompted)
Enter the vendors to copy From and To
Check the “Transfer Posted Checks” box
Enter 1 for “Beginning Ref #” and 9999 for “Ending Ref #”
Click on OK

IMPORTANT NOTES

Find Us

Telephone

856-310-0006

Email Address

monica@damoreconsulting.com

Mailing Address

218 Hutchinson Avenue Haddonfield, NJ 08033

Contact Us

  • This field is for validation purposes and should be left unchanged.

Tabs3: How to See A/R for a Specific Date

Tabs3: How to See A/R for a Specific Date

To see A/R at a certain point in time you can run the Client Ledger Report in Tabs3:

Click on Reports |Client Reports | Client Ledger Report

Make sure that no options are selected on the “Client” tab

Click on the “Options” tab and enter an Ending Date (only)

Uncheck the “Include Zero Balance Clients” box

Check the “Summary” Box

Click on the “Format” tab and ensure that the “Balance Due” box is checked (select/ deselect others as desired)

Click on the “Sort” tab and set to your liking

Find Us

Telephone

856-310-0006

Email Address

monica@damoreconsulting.com

Mailing Address

218 Hutchinson Avenue Haddonfield, NJ 08033

Contact Us

  • This field is for validation purposes and should be left unchanged.

How to Create a New Column Layout in Any List in PracticeMaster

How to Create a New Column Layout in Any List in PracticeMaster

To Create a New Column Layout in a PracticeMaster List:

Display the list that you want to work with (i.e. the Client or Contact List)

Open the QuickClicks menu and click on “Manage Column Layouts”

Click on the New Record Button on the toolbar

Type a Column Layout Name

Select the first column from the list of Available Fields* and click on “Add”

Repeat for additional columns

Click Save

Close the “Manage Quick Clicks” dialog box

Select your new column layout from the QuickClicks list

Find Us

Telephone

856-310-0006

Email Address

monica@damoreconsulting.com

Mailing Address

218 Hutchinson Avenue Haddonfield, NJ 08033

Contact Us

  • This field is for validation purposes and should be left unchanged.

Don’t Be A Backup Horror Story

Don’t Be A Backup Horror Story

It was a dark and stormy afternoon at the office. The lights flickered on and off before the power went out completely. Panic ensued for several long minutes until the lights finally came back on. In the unexpected glare, a scream rang out in the office…the administrator saw that the server had crashed…

Sound familiar? Major data loss is preventable by ensuring that you have a viable backup at all times. The following are examples of some horror stories reported by our Technical Support Department:

No Backup: You need to restore your data and realize there are no backups for the last several months – no backups in Tabs3, and no third party backups. The third party backup system was set to run nightly, but had not been tested recently so no one noticed that it wasn’t working…

Corrupted Backup: You successfully restore your data, but a Data File Integrity Check or Archive Integrity Check is not run in all programs to verify that the data is error free. Everyone starts working again, reentering missing data as well as new data. Then you discover that the backup had the same corruption you attempted to fix by restoring…

Incremental Backup: You use an incremental backup system. Unfortunately, instead of restoring the last full backup followed by every incremental backup made since then in order, you restored only this morning’s partial backup. Data is still missing, and you may also receive fatal errors…

Don’t be the victim of your own horror story. Check out Knowledge Base Article R11213, “Backup Strategy” for strategies and recommendations for backing up your data, and Knowledge Base Article R10456, “Testing Your Backup System” for information and suggestions for testing your current backup system if you don’t have time. Additional resources can be located in Knowledge Base Article R11524, “Backup/Restore Information Resources.”

Don’t forget HotBackup, which is available in the Platinum version of Tabs3 & PracticeMaster! HotBackups can be scheduled to run at any time of the day, including when others are currently working in the software. For more information on HotBackup and other Platinum features, check out www.Tabs3.com/Platinum or Knowledge Base Article R11193, “Hot Backup Overview.”

Find Us

Telephone

856-310-0006

Email Address

monica@damoreconsulting.com

Mailing Address

218 Hutchinson Avenue Haddonfield, NJ 08033

Contact Us

  • This field is for validation purposes and should be left unchanged.

Starting E-mails Automatically Using WorkFlows (PracticeMaster)

Starting E-mails Automatically Using WorkFlows (PracticeMaster)

Q: When I close a client matter in PracticeMaster, I e-mail our Billing Department so they can verify that there is not an outstanding balance that needs to be settled, but sometimes I forget. Can I automate this process so that I don’t forget to send them an e-mail?

A: Yes, you can! A WorkFlow can be created that will automatically start an e-mail once the matter’s Date Closed field is changed from mm/dd/yyyy to a date. Furthermore, the WorkFlow can be customized to automatically include specific client related information in the Subject and/or Body of the e-mail. This means that once the matter is closed, all
you need to do is click Send on the e-mail.

To create a WorkFlow that runs when a file is closed
1. From the Maintenance menu, select WorkFlows.
2. Select the Client folder and click the New button.
3. Enter a Name for the WorkFlow.
4. Clear the Prompt Before Running check box.
5. In the Event section:

  • Select the Record Changed check box.
  • Select the Specific Field option and select the Close_Date field.
  • Select the Value Before check box and leave the default value as mm/dd/yyyy.


6. In the Actions section, click the New button.

  • Select the Start E-mail option.
  • Click Next.
  • Click in the To field.
  • Click the Value button.
  • In the Value field, enter the e-mail address for your Billing Department.
  • Click OK on the Value window.
  • Click OK on the WorkFlow Expression Editor window.
  • Optionally click in the Subject and/or Body fields to automate text.
  • Click Finish.

7. Click Save.
Now whenever a date is entered into the Date Closed field, an e-mail will automatically be started once the record is saved

Find Us

Telephone

856-310-0006

Email Address

monica@damoreconsulting.com

Mailing Address

218 Hutchinson Avenue Haddonfield, NJ 08033

Contact Us

  • This field is for validation purposes and should be left unchanged.

Use Original Statement Number (Tabs3)

Use Original Statement Number (Tabs3)

I processed a batch of final statements with the wrong statement date. I don’t want the statement number to increment for the clients even further when I reprocess them with the correct date. Is there a way to prevent the statement numbers from changing?

If the Statement Numbering option in Customization (Utilities | Customization | Options tab) is set for Firm Level, running final statements saves the statement number that was assigned to each statement. If final bills are run a second time before the first statement is updated, the statement numbers are incremented by default. To prevent this, simply select the Use Original Statement Number option on the Options tab first. Alternatively, you can enter a different Beginning Statement Number.

For more information about the statement numbering process, please review Knowledge Base Article R10956, “All About Statement Numbering.”

Find Us

Telephone

856-310-0006

Email Address

monica@damoreconsulting.com

Mailing Address

218 Hutchinson Avenue Haddonfield, NJ 08033

Contact Us

  • This field is for validation purposes and should be left unchanged.

Assign Timekeeper (Tabs3)

Assign Timekeeper (Tabs3)

I have a new employee who will be entering data exclusively for a single timekeeper. Is there a way to limit this user’s access so that they can only enter time for the one timekeeper?

Yes, there is! You can assign timekeepers to a user via User Configuration in System Configuration. Assigning timekeepers restricts data entry to only those that are assigned.

To assign a timekeeper to a user:
1. Open System Configuration.
2. From the File menu, point to Open and select Users.
3. Select the desired User ID.
4. Select the Assign Tabs3/PracticeMaster Timekeepers check box.
5. Select the timekeeper to which this user needs access.
6. Press Ctrl+S.
Note: Keep in mind that while all transactions and productivity for other timekeepers will be excluded from reports run by this user, accounts receivable and billing information will not be affected.

For more information on how assigning Tabs3 Timekeepers affects report generation and other tasks, refer to Knowledge Base Article R11328, “Assigning Tabs3/PracticeMaster Timekeepers.”

Find Us

Telephone

856-310-0006

Email Address

monica@damoreconsulting.com

Mailing Address

218 Hutchinson Avenue Haddonfield, NJ 08033

Contact Us

  • This field is for validation purposes and should be left unchanged.